【Unity】float型配列をカラーマップに変換するComputeShader
とある数値データを可視化する際、以下のようなカラーマップで表現することがあります。最近は街中のモニター体温計などでよく見ますね。
What is Thermography? -

気象庁 | 海面水温に関する診断表、データ 日別海面水温

Unityでこれをやりたい場面があったので、数値を画像に変えるコンピュートシェーダーをかいてみたのでメモです。
実装
ComputeShader
#pragma kernel GetColorMapTex

Texture2D<float4> _ColorMapTex; // カラーマップの色の参考テクスチャ
int _ColorMapTexWidth;
float _CutOffValue; // ある数値以下の値は透明にしたい場合に使用
int _ResolutionX; // ColorMapの画質(横)
int _ResolutionY; // ColorMapの画質(縦)
RWTexture2D<float4> _ResultTex;

StructuredBuffer<float> _ValueBuffer;

[numthreads(1, 1 ,1)]
void GetColorMapTex(uint2 id : SV_DispatchThreadID)
{
    int valueBufferId = id.x + id.y * _ResolutionX;
    float powerVal = _ValueBuffer[valueBufferId];

    uint2 uv = uint2(
        floor(_ColorMapTexWidth * powerVal),
        0
    );
    float4 powerColor = _ColorMapTex[uv];
    if (powerVal < _CutOffValue) powerColor.a = 0;

    _ResultTex[id] = powerColor;
}
CPU側(C#)
using System;
using Cysharp.Threading.Tasks;
using System.Runtime.InteropServices;
using UnityEngine;

[RequireComponent(typeof(MeshRenderer))]
public class PowerMapVisualizer : MonoBehaviour
{
    [SerializeField] private ComputeShader _shaderSource;
    [SerializeField] private Texture _colorMapTex;
    [SerializeField] private string _texPropertyName = "_MainTex";
    [SerializeField] private float _cutOffValue = 0.1f;
    [SerializeField] private int _resolutionX = 33;
    [SerializeField] private int _resolutionY = 33;
    [SerializeField] private float _intervalSec = 0.1f;

    private float[] _powerValueArr;
    private int _shaderKernelId;
    private ComputeShader _shader;
    private ComputeBuffer _shaderBuffer;
    private RenderTexture _resultRenderTex;
    private Material _material;

    private void Start()
    {
        int powerValueLength = _resolutionX * _resolutionY;
        _powerValueArr = new float[powerValueLength];

        _shader = Instantiate(_shaderSource);
        _shaderKernelId = _shader.FindKernel("GetPowerMapTex");
        _shaderBuffer = new ComputeBuffer(powerValueLength, Marshal.SizeOf(typeof(float)));

        _resultRenderTex =
            new RenderTexture(_resolutionX, _resolutionY, 0, RenderTextureFormat.ARGB32);
        _resultRenderTex.enableRandomWrite = true;
        _resultRenderTex.Create();

        _shader.SetTexture(_shaderKernelId, "_ColorMapTex", _colorMapTex);
        _shader.SetInt("_ColorMapTexWidth", _colorMapTex.width);
        _shader.SetFloat("_CutOffValue", _cutOffValue);
        _shader.SetInt("_ResolutionX", _resolutionX);
        _shader.SetInt("ResolutionY", _resolutionY);
        _shader.SetTexture(_shaderKernelId, "_ResultRWTex", _resultRenderTex);

        _material = GetComponent<MeshRenderer>().material;
        UpdatePowerMapLoop();
    }

    private async void UpdatePowerMapLoop()
    {
        while (true)
        {
            UpdateTexture();
            await UniTask.Delay(TimeSpan.FromSeconds(_intervalSec));
        }
    }

    private void UpdateTexture()
    {
        // 仮数値データ生成箇所
        for (int y = 0; y < _resolutionY; y++)
        {
            for (int x = 0; x < _resolutionX; x++)
            {
                int index = x + y * _resolutionX;
                float lengthX = x * 2f / _resolutionX - 1f;
                float lengthY = y * 2f / _resolutionY - 1f;
                Vector2 distFromCenter = new Vector2(lengthX, lengthY);
                float length = distFromCenter.magnitude;
                _powerValueArr[index] = Mathf.Abs(Mathf.Sin(length - Time.time));
            }
        }

        _shaderBuffer.SetData(_powerValueArr);

        _shader.SetBuffer(_shaderKernelId, "_ValueBuffer", _shaderBuffer);
        _shader.Dispatch(_shaderKernelId, _resolutionX, _resolutionY, 1);
        _material.SetTexture(_texPropertyName, _resultRenderTex);
    }

    private void OnDisable()
    {
        _shaderBuffer.Release();
    }
}
↑コメント入れた個所で、中心からぐわーって広がるような仮の値を突っ込んでいます。

Unlit/Transparent のマテリアルをあてた正方形のPlaneにこのスクリプトをアタッチしてみます。
ColorMapTexにはカラーマップの元となる画像を入れます。自分はMATLAB(数値解析ソフト)で jet と呼ばれる画像を適用しました。
結果
これだけでは対して面白くないですが、AR等でこの画像をもとにいろいろとできそうな感じです。(時が来たらブログを書きます)
参考
コンピュートシェーダーについて、以下記事を参考にさせていただきました。
【Unity, ARFoundation】ARKitの空間情報記録機能「ARWorldMap」を使ってみた

ARKitには ARWorldMap という、取得した空間の特徴点情報を一つにまとめる機能があります。
ARWorldMapを外部データとして保存 / 読み込みすることで、以下のようなことが実現できるでしょう。
* 空間に対するユーザーの位置を算出
* コンテンツの基準点を常に一定の位置に設定(ARAnchorとの併用
* 保存した空間の形状を点群で表示し、俯瞰的に観測
...etc
今回はUnityおよび ARFoundation を通じて、この機能に関する開発を行ってみました。
最終的には ARAnchor と組み合わせることで、配置した3DオブジェクトをARWorldMap読み込み時に復元するアプリケーションを作成してみます。
目次
リポジトリ
公式サンプルをForkし、以下フォルダに2つデモを追加しました。
/Assets/_ExtraDemo
環境
- 開発PC : Windows10 Pro
- Unity : 2019.4.8
- ビルドPC ; MacMini(2020) Catalina 10.15.6
Unity Package
- ARFoundation : 3.1.5
- ARKitPlugin : 3.1.7
空間の特徴点情報 保存/読込
ARFoundationの公式サンプルに ARWorldMap に関するデモシーンがあります。
こちらが最もシンプルに、空間情報を保存 / 読込できるもののようです。先ずはこちらをビルドしてみました。
Sceneのパス : /Assets/Scenes/ARWorldMap.unity
実装
以下の1スクリプトで実装されています。
Assets/Scripts/ARWorldMapController.cs
上記スクリプトの中からARWorldMap保存/読み込みに関するメソッドを抜き出してみました。
ARKit独自機能なため、プラットフォームの #define ディレクティブ #if UNITY_IOS で囲ってあげないとAndroid時にエラーが出るので要注意です。
#if UNITY_IOS
    IEnumerator Save()
    {
        // ARKitSessionSubsystemをARSessionから取得
        var sessionSubsystem = (ARKitSessionSubsystem)m_ARSession.subsystem;
        if (sessionSubsystem == null)
        {
            Log("No session subsystem available. Could not save.");
            yield break;
        }

        // ARWorldMapRequestをARKitSessionSubsystemから取得
        var request = sessionSubsystem.GetARWorldMapAsync();

        // ARWorldMapRequestが終わるまでループ
        while (!request.status.IsDone())
            yield return null;

        // ARWorldMapRequestがエラー時
        if (request.status.IsError())
        {
            Log(string.Format("Session serialization failed with status {0}", request.status));
            yield break;
        }

        // ARWorldMapを取得しRequestを破棄
        var worldMap = request.GetWorldMap();
        request.Dispose();

        SaveAndDisposeWorldMap(worldMap);
    }

    void SaveAndDisposeWorldMap(ARWorldMap worldMap)
    {
        // ARWorldMapをNativeArray<Vector3>にシリアライズ
        Log("Serializing ARWorldMap to byte array...");
        var data = worldMap.Serialize(Allocator.Temp);
        Log(string.Format("ARWorldMap has {0} bytes.", data.Length));

        // ローカルに保存
        var file = File.Open(path, FileMode.Create);
        var writer = new BinaryWriter(file);
        writer.Write(data.ToArray());
        writer.Close();

        // 用済みのデータやARWroldMap破棄
        data.Dispose();
        worldMap.Dispose();
        Log(string.Format("ARWorldMap written to {0}", path));
    }

    IEnumerator Load()
    {
        var sessionSubsystem = (ARKitSessionSubsystem)m_ARSession.subsystem;
        if (sessionSubsystem == null)
        {
            Log("No session subsystem available. Could not load.");
            yield break;
        }

        // ファイルを読み込み、NativeArray<byte>生成
        var file = File.Open(path, FileMode.Open);
        if (file == null)
        {
            Log(string.Format("File {0} does not exist.", path));
            yield break;
        }

        Log(string.Format("Reading {0}...", path));

        int bytesPerFrame = 1024 * 10;
        var bytesRemaining = file.Length;
        var binaryReader = new BinaryReader(file);
        var allBytes = new List<byte>();
        while (bytesRemaining > 0)
        {
            var bytes = binaryReader.ReadBytes(bytesPerFrame);
            allBytes.AddRange(bytes);
            bytesRemaining -= bytesPerFrame;
            yield return null;
        }

        var data = new NativeArray<byte>(allBytes.Count, Allocator.Temp);
        data.CopyFrom(allBytes.ToArray());

        // NativeArray<byte>をARWorldMapにデシリアライズ
        Log(string.Format("Deserializing to ARWorldMap...", path));
        ARWorldMap worldMap;
        if (ARWorldMap.TryDeserialize(data, out worldMap))
        data.Dispose();

        if (worldMap.valid)
        {
            Log("Deserialized successfully.");
        }
        else
        {
            Debug.LogError("Data is not a valid ARWorldMap.");
            yield break;
        }

        // ARWorldMapをARKitSubsystemに適用
        Log("Apply ARWorldMap to current session.");
        sessionSubsystem.ApplyWorldMap(worldMap);
    }
#endif
結果

このようにスキャンし、セーブボタンを押すとARWorldMapが保存されます。
アプリを再起動しロードボタンを押してみると、20秒ほどで前回保存したARWorldMapが読み込まれます。
使用上のポイント
このデモSceneをビルドする上で注意点があったのでまとめます。
1. 対応バージョン要確認
使用したいUnityバージョンによって、サンプルのバージョンが変わります。
今回は記事投稿時点で安定してそうな 3.1 を選択しました。
latest-version以外を使用する場合は、gitブランチを切り替えましょう。
2. Packageに関するエラー
使用するUnityバージョンによって、以下のようなエラーが出ます。

エラーに該当するPackageのバージョンが Verify になっているか、PackageManagerで確認しましょう。

3. MappingStatusTextが表示されない
Textの参照がなぜか初期状態ではずれていました。 実機でログを確認したい方は、UITextにあてはめましょう。

4. 読込待機時間
保存は一瞬で終わるのに対して、読み込みは結構かかります。 だいたいですが、20畳くらいの部屋の空間マップデータが20~30秒かかりました。
コンテンツに盛り込む場合は、ローディングをつける等の工夫が必要そうですね。
ARAnchorとの併用
ドキュメントをみると、ARWorldMap は空間の特徴点情報と一緒に、 ARAnchor の情報も含んでくれるようです。
タップ位置にアンカーを作成する実装を加えて、検証してみました。
Sceneのパス : Assets/_ExtraDemo/Scenes/ARWorldMapWithAnchors.unity
実装
アンカーに関する実装は、以下のサンプルSceneがあります。
Assets/Scenes/AnchorPoints.unity
要するに、以下3つのコンポーネントを ARSessionOrigin に追加するとよさそうです。
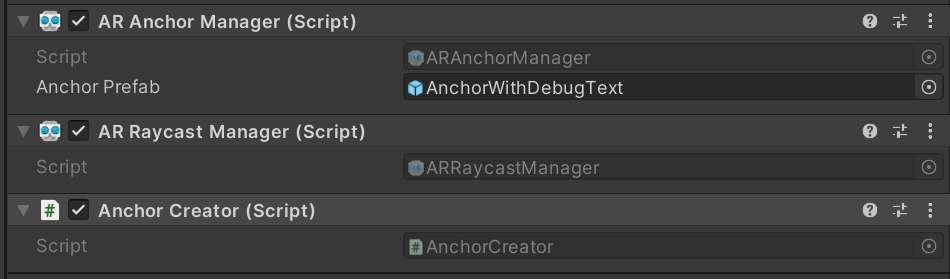
Assets/Scripts/AnchorCreator.cs はタップ位置にARAnchorを設置するスクリプトです。
今回詳しい内容は割愛しますが、このままだとUIをすり抜けてAnchorが生成されてしまうため、Update内に以下スクリプトを追加してあげるとより良い感じです。
// uGUI操作時は無視
if (EventSystem.current.IsPointerOverGameObject(Input.GetTouch(0).fingerId)) {
     return;
}
結果
Anchorを乱れうちしてARWorldMapを保存。
読み込んだところ復元しました。
3Dモデルの配置復元
無事にARAnchorもARWorldMapに含まれて保存できていることを確認しました。 つまり、ある3DモデルとARAnchorとの位置関係を別途保存しておけば、そのモデルも同位置に復元することができそうです。
Sceneのパス : Assets/_ExtraDemo/Scenes/ARWorldMapWithAnchorAndOrnament.unity
実装
単体のARAnchor作成機能
まず、 ARAnchor は1つで十分なので、1つだけ作成するスクリプトを作ります。
これは AR Session Origin にアタッチして使用します。
using System.Collections.Generic;
using System.Linq;
using UnityEngine;
using UnityEngine.EventSystems;
using UnityEngine.XR.ARFoundation;
using UnityEngine.XR.ARSubsystems;

[RequireComponent(typeof(ARAnchorManager))]
[RequireComponent(typeof(ARRaycastManager))]
public class SingleAnchorCreator : MonoBehaviour
{
    [SerializeField] private Transform _anchorTrackingTransform;

    private ARAnchor _anchor;
    private ARRaycastManager _raycastManager;
    private ARAnchorManager _anchorManager;
    private static List<ARRaycastHit> _raycastHits = new List<ARRaycastHit>();

    public ARAnchor Anchor => _anchor;

    void Awake()
    {
        _raycastManager = GetComponent<ARRaycastManager>();
        _anchorManager = GetComponent<ARAnchorManager>();

        _anchorManager.anchorsChanged += OnAnchorsChanged;
    }

    void Update()
    {
        // シングルタップ時以外は無視
        if (Input.touchCount != 1)
        {
            return;
        }

        // uGUI操作時は無視
        if (EventSystem.current.IsPointerOverGameObject(Input.GetTouch(0).fingerId))
        {
            return;
        }

        // タッチ開始時以外は無視
        Touch touch = Input.GetTouch(0);
        if (touch.phase != TouchPhase.Began)
        {
            return;
        }


        if (_raycastManager.Raycast(touch.position, _raycastHits, TrackableType.FeaturePoint))
        {
            // 古いAnchor削除
            RemoveAnchor();

            // 新規Anchor作成
            Pose hitPose = _raycastHits[0].pose;
            AddAnchor(hitPose);
        }
    }

    private void OnAnchorsChanged(ARAnchorsChangedEventArgs eventArgs)
    {
        if (eventArgs.added.Count > 0)
        {
            Transform targetTransform = eventArgs.added.Last().transform;
            Pose targetPose = new Pose(targetTransform.position, targetTransform.rotation);
            MoveTrackingObj(targetPose);
        }
    }

    public void AddAnchor(Pose hitPose)
    {
        _anchor = _anchorManager.AddAnchor(hitPose);
        if (_anchor == null)
        {
            Logger.Log("Error creating anchor");
        }
    }

    public void RemoveAnchor()
    {
        if (_anchor == null)
        {
            return;
        }

        _anchorManager.RemoveAnchor(_anchor);
        _anchor = null;
    }

    public void MoveTrackingObj(Pose pose)
    {
        _anchorTrackingTransform.SetPositionAndRotation(pose.position, pose.rotation);
    }

}
3Dモデル配置 / 保存 / 読み込み 機能
つぎに3Dオブジェクトです。以下機能を持つスクリプトを作成しました。
これも AR Session Origin に追加します。
* 2本指タップで3Dモデルの配置
* ARAnchorとの位置関係を保存 / 読み込みするメソッド
using System.Collections.Generic;
using System.Linq;
using UnityEngine;
using UnityEngine.EventSystems;
using UnityEngine.XR.ARFoundation;
using UnityEngine.XR.ARSubsystems;

[RequireComponent(typeof(ARAnchorManager))]
[RequireComponent(typeof(ARRaycastManager))]
public class OrnamentCreator : MonoBehaviour
{
    [SerializeField] private GameObject _ornamentPrefab;

    private ARRaycastManager _arRaycastManager;
    private ARAnchorManager _arAnchorManager;
    private ARAnchor _latestARAnchor;
    private GameObject _latestAnchorTrackerObj;
    private GameObject _ornamentObj;

    private static List<ARRaycastHit> _raycastHits = new List<ARRaycastHit>();

    void Start()
    {
        _arRaycastManager = GetComponent<ARRaycastManager>();
        _arAnchorManager = GetComponent<ARAnchorManager>();

        _latestAnchorTrackerObj = new GameObject();
        _latestAnchorTrackerObj.name = "ARAnchorTracker";

        _arAnchorManager.anchorsChanged += OnARAnchorChanged;
    }

    void Update()
    {
        // 2本タップ以外はスルー
        if (Input.touchCount != 2)
        {
            return;
        }

        // uGUI操作時は無視
        if (EventSystem.current.IsPointerOverGameObject(Input.GetTouch(0).fingerId)) {
            return;
        }

        // タップ開始時以外はスルー
        Touch touch = Input.GetTouch(0);
        if (touch.phase != TouchPhase.Began)
        {
            return;
        }

        // タップ処理
        if (_arRaycastManager.Raycast(touch.position, _raycastHits, TrackableType.FeaturePoint))
        {
            Pose hitPose = _raycastHits[0].pose;
            UpdateOrnament(hitPose);
        }
    }

    /// <summary>
    /// 置物の作成・位置の更新
    /// </summary>
    /// <param name="pose">配置位置</param>
    /// <param name="isPoseLocal">poseがローカル座標のときはtrue</param>
    private void UpdateOrnament(Pose pose, bool isPoseLocal = false)
    {
        if (_ornamentObj == null)
        {
            _ornamentObj = Instantiate(_ornamentPrefab, _latestAnchorTrackerObj.transform);
        }

        if (isPoseLocal)
        {
            _ornamentObj.transform.localPosition = pose.position;
            _ornamentObj.transform.localRotation = pose.rotation;
        }
        else
        {
            _ornamentObj.transform.SetPositionAndRotation(pose.position, pose.rotation);
        }
    }

    /// <summary>
    /// アンカー更新時のイベント
    /// </summary>
    /// <param name="eventArgs">イベントの変数</param>
    private void OnARAnchorChanged(ARAnchorsChangedEventArgs eventArgs)
    {
        // Anchor追加時
        if (eventArgs.added.Count > 0)
        {
            // 最新ARAnchor更新
            _latestARAnchor = eventArgs.added.Last();

            // _arAnchorTrackerObj移動
            Transform arAnchorTransform = _latestARAnchor.transform;
            _latestAnchorTrackerObj.transform.SetPositionAndRotation(
                arAnchorTransform.position,
                arAnchorTransform.rotation
            );
        }

        // Anchor消滅時
        if (eventArgs.removed.Contains(_latestARAnchor))
        {
            _latestARAnchor = null;
        }
    }

    /// <summary>
    /// アンカーに対する置物の位置を保存
    /// </summary>
    public void SaveOrnamentPoseFromAnchor()
    {
        // Anchorや置物がないときはスルー
        bool isEmpty = _latestARAnchor == null || _ornamentObj == null;
        if (isEmpty)
        {
            Debug.LogError("ARAnchor is not found;");
            return;
        }

        // Anchorとの位置関係を保存
        Vector3 diffPos = _ornamentObj.transform.localPosition;
        Quaternion diffRot = _ornamentObj.transform.localRotation;
        PlayerPrefs.SetFloat("OrnamentPosX", diffPos.x);
        PlayerPrefs.SetFloat("OrnamentPosY", diffPos.y);
        PlayerPrefs.SetFloat("OrnamentPosZ", diffPos.z);
        PlayerPrefs.SetFloat("OrnamentRotX", diffRot.x);
        PlayerPrefs.SetFloat("OrnamentRotY", diffRot.y);
        PlayerPrefs.SetFloat("OrnamentRotZ", diffRot.z);
        PlayerPrefs.SetFloat("OrnamentRotW", diffRot.w);
    }

    /// <summary>
    /// アンカーに対する置物の位置を読み込んで移動
    /// </summary>
    public void LoadOrnamentPoseFromAnchor()
    {
        // Anchorとの位置関係を読み込み
        float posX = PlayerPrefs.GetFloat("OrnamentPosX");
        float posY = PlayerPrefs.GetFloat("OrnamentPosY");
        float posZ = PlayerPrefs.GetFloat("OrnamentPosZ");
        float rotX = PlayerPrefs.GetFloat("OrnamentRotX");
        float rotY = PlayerPrefs.GetFloat("OrnamentRotY");
        float rotZ = PlayerPrefs.GetFloat("OrnamentRotZ");
        float rotW = PlayerPrefs.GetFloat("OrnamentRotW");

        Pose diffPose = new Pose(
            new Vector3(posX, posY, posZ),
            new Quaternion(rotX, rotY, rotZ, rotW)
        );
        UpdateOrnament(diffPose, true);
    }
}
別途3Dモデル位置のSaveとLoadボタンを用意し、それぞれ SaveOrnamentPoseFromAnchor と LoadOrnamentPoseFromAnchor が実行されるようにします。
ちなみに今回使用した3DモデルはAssetStoreでみつけた宝箱。
結果

このように配置して保存。
アプリ再起動後にARWorldMapと3Dモデル位置を読み込むと、宝箱を同じ位置に再配置することができました。
まとめ
iOS限定ではありますが、空間情報を保存することができました。
マルチプラットフォームで空間情報を保存・共有したい場合には AzureSpatialAnchor なども検討してみたほうがいいかもしれませんね。
Appendix
ARWorldMapの参考記事
developer.apple.com qiita.com qiita.com qiita.com shu223.hatenablog.com
iOSビルドうまくいかない問題
今回、新品のMacMiniでiOS13.7にビルドをしようとしたら、Permision denied エラーやら、XCodeのバージョン違いやらで結構つまづいてしまいました。
いつの時代もスッといくものではないですよね...(1年半前くらいにも天を仰いだ気がする)。
今回ビルドが通るまでに参考になった記事を載せておきます。 以下はすべての人に当てはまるわけではないので、うまくいかない人はめげずにエラー文で検索してみましょう。
【SparkAR】耳に3Dモデルをつける
SparkARを勉強中です(10000フィルターつくるぞ!)
耳にピアス的なものをつける簡単なエフェクトをつくりたかったのですが、少しだけ工夫が必要だったのでメモしときます。
Gitリポジトリ

Libraryの 3D Objects から星をインポートして、耳に取り付けました。
FaceTargetTrakingの下にアクセサリーを二つ配置

faceTrakerの下に両耳に取り付けたい3Dモデルを2つ配置します。

すると鼻の位置に星が二つ来ます。
これらの 3D position を調整して両耳の位置にもってきてもそれっぽくなります。
しかし、顔の幅が人それぞれなため、すべての人の耳の位置にはなりませんでした。
ほほ骨基準で配置する
以下のようにノードを組むと、だいたい耳に配置できることがわかりました

- FaceFinder -> FaceSelect : 顔を取得
- Cheek(Left Cheekbone, Right Cheekbone) : ほほの位置を取得
- Add : ほほ骨から耳の位置に微修正
補足 : HeadOccluderを追加

LibraryからHeadOccluderを追加することで、顔を傾けたときに耳のアクセサリーが隠れるようになるのでおススメです!
今回は以上です。
MRTKをインポートするとRiderのdllと衝突してエラーが出た話
最近HoloLens2を入手しました! 私事ですが、2年半ぶりにHoloLens開発をするのでとてもワクワクです。
my new gear...
— Hancho@xR (@a_hancho) 2020年8月6日
3年前やっていた音の可視化研究をアップデートします🕶️#HoloLens pic.twitter.com/l5K83qn51W
意気揚々とMRTK(MixedRealityToolKit)をUnityにインポートしたところ、とあるエラーがでてしまいました。
検索しても同じ症状の方がいなかったので...誰かの役にたつかもしれないと思ってメモしておきます。
エラー内容

以下2つでINotifyCompletion が重複して定義されているような内容です。
① mscorlib
.netのアセンブリ
② Assets/Plugins/Editor/JetBrains/JetBrains.Rider.Unity.Editor.Plugin.Repacked.dll
JetBrainRider関連のdll。
環境
- OS : Window10 Pro
- Unity : 2019.4.8f、2019.2.11f
- MRTK : v2.4.0
- Rider : 2020.2.1 (下記URLからダウンロード)
Rider: JetBrainsのクロスプラットフォーム.NET IDE
解決法
Riderを一度アンインストールし、JetBrain ToolBox Appからインストールすると解決しました。 こうすることで、②Riderのdllがなくなります。
以下記事の通り、Unity2019.2以降は②のdllは必要ないようです。 今回はなぜかこのdllが生まれていた上に、消しても解決しなかったので、思い切って再インストールしてみたところうまくいきました。
P.S. ほかに解決法を知っている方がいらっしゃったら教えていただけると嬉しいです。
【AzureKinect】【Unity】RGBカメラと深度センサの情報を画像として表示する

AzureKinectのRGBカメラと深度センサの情報は、最大30fpsの速さで取得することができます。 以下記事では、これらの情報からメッシュを生成しました。
今回は、各種情報をTexture2Dに変換して表示します。 AzureKinectをUnity上で開発する際に、基本となる実装になるでしょう。
基本実装
AzureKinectの起動や終了等、基盤となるスクリプトです。
using Microsoft.Azure.Kinect.Sensor;
using System.Threading.Tasks;
using UnityEngine;

public class KinectImageViewer : MonoBehaviour
{
    private Device _kinectDevice = null;

    private void Start()
    {
        Init();
        StartLoop();
    }

    private void OnDestroy()
    {
        _kinectDevice.StopCameras();  // Kinectの終了処理
    }

    private void Init()
    {
        _kinectDevice = Device.Open(0);
        _kinectDevice.StartCameras(new DeviceConfiguration
        {
            ColorFormat = ImageFormat.ColorBGRA32,
            ColorResolution = ColorResolution.R1080p,
            DepthMode = DepthMode.NFOV_2x2Binned,
            SynchronizedImagesOnly = true,
            CameraFPS = FPS.FPS30
        });  // Kinectの開始処理。設定はお好みで。
    }

    private async void StartLoop()
    {
        while (true)
        {
            using (Capture capture = await Task.Run(() => _kinectDevice.GetCapture()).ConfigureAwait(true))
            {
                // ここで画像の生成、更新処理を行う
            }
        }
    }
ループ部分のcapture に、今後の実装に必要なことが入っています。
Unity向けに改変して表示していきます。
なお、Unity上でAzureKinectを初めて使用する方は、以下記事を参考にセットアップしてください。 tks-yoshinaga.hatenablog.com
RGB画像の表示
capture.
capture.Color から1ピクセルずつの色情報を表すBGRA配列を取得し、テクスチャーを生成します。
そのままの順番で表示すると、上下左右が反転される点に注意しましょう。
UnityEngine.UI と Microsoft.Azure.Kinect.Sensor のImageが被るのでちょっとだけ厄介...。
using Microsoft.Azure.Kinect.Sensor;
using System.Threading.Tasks;
using UnityEngine;

public class KinectImageViewer : MonoBehaviour
{
    [SerializeField] private UnityEngine.UI.RawImage _viewerRawImage = null;

    // --- 省略  ---

    private async void StartLoop()
    {
        while (true)
        {
            using (Capture capture = await Task.Run(() => _kinectDevice.GetCapture()).ConfigureAwait(true))
            {
                // 必要な情報を用意
                Image colorImage = capture.Color;
                int pixelWidth = colorImage.WidthPixels;
                int pixelHeight = colorImage.HeightPixels;
                BGRA[] bgraArr = colorImage.GetPixels<BGRA>().ToArray();
                Color32[] colorArr = new Color32[bgraArr.Length];

                // BGRA配列 => Color32配列
                for (int i = 0; i < colorArr.Length; i++)
                {
                    int index = colorArr.Length - 1 - i;
                    colorArr[i] = new Color32(
                        bgraArr[index].R,
                        bgraArr[index].G,
                        bgraArr[index].B,
                        bgraArr[index].A
                    );
                }

                // Texture2Dの作成
                Texture2D resultTex = new Texture2D(pixelWidth , pixelHeight );
                resultTex.SetPixels32(colorArr);
                resultTex.Apply();

                // RawImageの更新
                _viewerRawImage.texture = GetTexture2D(pixelWidth, pixelHeight, colorArr);
                _viewerRawImage.rectTransform.sizeDelta = new Vector2(width, height); // rectTransformのサイズ変更
        }
    }
}
その辺にあったガムやルアーを配置して撮影してみました
深度画像の表示
capture.Depth から震度情報のushort配列を取得し、テクスチャーを生成します。
深度の範囲を指定できるようにしておくと、いい感じに画像を調整できます。
using Microsoft.Azure.Kinect.Sensor;
using System.Threading.Tasks;
using UnityEngine;

public class KinectImageViewer : MonoBehaviour
{
    [SerializeField] private UnityEngine.UI.RawImage _viewerRawImage = null;
    [SerializeField] private int _depthDistanceMin = 200;
    [SerializeField] private int _depthDistanceMax = 3000;

    // --- 省略  ---

    private async void StartLoop()
    {
        while (true)
        {
            using (Capture capture = await Task.Run(() => _kinectDevice.GetCapture()).ConfigureAwait(true))
            {
                // 必要な情報を用意
                Image depthImage = capture.Depth;
                int pixelWidth = depthImage.WidthPixels;
                int pixelHeight = depthImage.HeightPixels;
                ushort[] depthByteArr = depthImage.GetPixels<ushort>().ToArray();
                Color32[] colorArr = new Color32[depthByteArr.Length];

                // ushort配列 => Color32配列
                for (int i = 0; i < colorArr.Length; i++)
                {
                    int index = colorArr.Length - 1 - i;

                    int depthVal = 255 - (255 * (depthByteArr[index] - _depthDistanceMin) / _depthDistanceMax);  // 近いほど値が大きくなるよう計算
                    if (depthVal < 0)
                    {
                        depthVal = 0;
                    }
                    else if (depthVal > 255)
                    {
                        depthVal = 255;
                    }

                    colorArr[i] = new Color32(
                        (byte)depthVal,
                        (byte)depthVal,
                        (byte)depthVal,
                        255
                    );
                }

                // Texture2Dの作成
                Texture2D resultTex = new Texture2D(pixelWidth , pixelHeight );
                resultTex.SetPixels32(colorArr);
                resultTex.Apply();

                // RawImageの更新
                _viewerRawImage.texture = GetTexture2D(pixelWidth, pixelHeight, colorArr);
                _viewerRawImage.rectTransform.sizeDelta = new Vector2(width, height); // rectTransformのサイズ変更
        }
    }
}
結果はこんな感じ。RGBとDepthでは画角が異なります。

完成版スクリプト

Inspector上で以下を変更できるようにしてみました。
- 表示する画像を選択(RGB or Depth)
- 深度の範囲
using Microsoft.Azure.Kinect.Sensor;
using System.Threading.Tasks;
using UnityEngine;

public enum KinectImageType
{
    RGB = 0,
    Depth = 1,
}

public class KinectImageViewer : MonoBehaviour
{
    [SerializeField] private KinectImageType _imageType = KinectImageType.RGB;
    [SerializeField] private UnityEngine.UI.RawImage _viewerRawImage = null;
    [SerializeField] private int _depthDistanceMin = 500;
    [SerializeField] private int _depthDistanceMax = 5000;

    private Device _kinectDevice = null;

    private void Start()
    {
        InitKinect();
        StartLoop();
    }

    private void OnDestroy()
    {
        _kinectDevice.StopCameras();
    }

    private void InitKinect()
    {
        _kinectDevice = Device.Open(0);
        _kinectDevice.StartCameras(new DeviceConfiguration
        {
            ColorFormat = ImageFormat.ColorBGRA32,
            ColorResolution = ColorResolution.R1080p,
            DepthMode = DepthMode.NFOV_2x2Binned,
            SynchronizedImagesOnly = true,
            CameraFPS = FPS.FPS30
        });
    }

    private async void StartLoop()
    {
        while (true)
        {
            using (Capture capture = await Task.Run(() => _kinectDevice.GetCapture()).ConfigureAwait(true))
            {
                if (_imageType == 0)
                {
                    ViewColorImage(capture);
                }
                else
                {
                    ViewDepthImage(capture);
                }
            }
        }
    }

    // RGB情報をRawImageに表示
    private void ViewColorImage(Capture capture)
    {
        Image colorImage = capture.Color;
        int pixelWidth = colorImage.WidthPixels;
        int pixelHeight = colorImage.HeightPixels;

        BGRA[] bgraArr = colorImage.GetPixels<BGRA>().ToArray();
        Color32[] colorArr = new Color32[bgraArr.Length];

        for (int i = 0; i < colorArr.Length; i++)
        {
            int index = colorArr.Length - 1 - i;
            colorArr[i] = new Color32(
                bgraArr[index].R,
                bgraArr[index].G,
                bgraArr[index].B,
                bgraArr[index].A
            );
        }

        _viewerRawImage.texture = GetTexture2D(pixelWidth, pixelHeight, colorArr);
    }

    // 深度情報をRawImageに表示
    private void ViewDepthImage(Capture capture)
    {
        Image colorImage = capture.Depth;
        int pixelWidth = colorImage.WidthPixels;
        int pixelHeight = colorImage.HeightPixels;

        ushort[] depthByteArr = colorImage.GetPixels<ushort>().ToArray();
        Color32[] colorArr = new Color32[depthByteArr.Length];

        for (int i = 0; i < colorArr.Length; i++)
        {
            int index = colorArr.Length - 1 - i;

            int depthVal = 255 - (255 * (depthByteArr[index] - _depthDistanceMin) / _depthDistanceMax);
            if (depthVal < 0)
            {
                depthVal = 0;
            }
            else if (depthVal > 255)
            {
                depthVal = 255;
            }

            colorArr[i] = new Color32(
                (byte)depthVal,
                (byte)depthVal,
                (byte)depthVal,
                255
            );
        }

        _viewerRawImage.texture = GetTexture2D(pixelWidth, pixelHeight, colorArr);
    }

    // カラー配列 -> Texture2D
    private Texture2D GetTexture2D(int width, int height, Color32[] colorArr)
    {
        _viewerRawImage.rectTransform.sizeDelta = new Vector2(width, height);

        Texture2D resultTex = new Texture2D(width, height);
        resultTex.SetPixels32(colorArr);
        resultTex.Apply();
        return resultTex;
    }
}
参考記事
以下の公式サンプル github.com
Unityを使用せずに画像を表示している記事 tks-yoshinaga.hatenablog.com tks-yoshinaga.hatenablog.com
を参考にさせていただきました。
【AzureKinect】【Unity】点群からメッシュをリアルタイム生成する

まえがき
最近、AzureKinectを入手しました! 楽しいです。
本記事では、↓動画のようにリアルタイムで点群からメッシュ化する実装を紹介します。
#AzureKinect でとった点群を、リアルタイムでMesh化できました pic.twitter.com/nJJoyQ15uE
— Hancho@xR (@a_hancho) 2020年7月6日
目次
本編
点群を表示
まずはベースとなる点群を表示します。こちらの記事がとても参考になりました。
AzureKinectから取得できるColorImageとDepthImageから、それぞれ点の頂点カラーと座標を取得しています。
このようなものができます。
頂点からポリゴン生成
上記記事内のコードで、以下のような記述があります。
mesh.SetIndices(indices, MeshTopology.Points, 0);
こちらは、ポリゴンの形状と頂点を指定する関数です。点群を表す MeshTopology.Points の場合、indices(int[]またはList<int>) には 0 ~ 頂点の合計数 の数が順番に入っているとよさそうです。
こちらを MeshTopology.Triangles に変更し、indicesを三角形を紡いでいくように指定すると、面が成形できます。
そこで、以下のように変更してみます。
using Microsoft.Azure.Kinect.Sensor;
using System.Collections.Generic;
using System.Threading.Tasks;
using UnityEngine;

public class KinectScript : MonoBehaviour
{
    // --- 省略  ---

    private void InitMesh()
    {
        // --- 省略  ---

        List<int> indices = GetTriangleIndiceList();
        mesh.SetIndices(indices, MeshTopology.Triangles, 0);
        gameObject.GetComponent<MeshFilter>().mesh = mesh;
    }

    // triangleのindiceを取得する関数
    private List<int> GetTriangleIndiceList()
    {
        int width = kinect.GetCalibration().DepthCameraCalibration.ResolutionWidth;
        int height = kinect.GetCalibration().DepthCameraCalibration.ResolutionHeight;
        List<int> indicateList = new List<int>();

        for (int y = 0; y < height - 1; y++)
        {
            for (int x = 0; x < width - 1; x++)
            {
                int index = y * width + x;
                int a = index;
                int b = index + 1;
                int c = index + width;
                int d = index + width + 1;

                indicateList.Add(a);
                indicateList.Add(b);
                indicateList.Add(c);
                indicateList.Add(c);
                indicateList.Add(b);
                indicateList.Add(d);
            }
        }
        return indicateList;
    }
}
完成品がこちら

正面からみるとできているようですが、俯瞰で見ると大変なことに...。
positionが(0, 0, 0)の頂点を含む場合はポリゴン生成しない
失敗したメッシュをよく分析してみると、positionがVector3(0, 0, 0)の点が無数あって、そこから面が作られているのが原因でした。
ここで、DepthImageを確認してみましょう。 白に近いほどAzureKinectから近距離にあります。

人の周りなど、深度差が大きい箇所が真っ白になっています。この部分の頂点がVector3(0, 0, 0)になってしまうようです。
そこで、頂点のpositionのVector3.magnitudeが0の点を含んでいた場合はポリゴンの生成を行わないようにしてみます。
using Microsoft.Azure.Kinect.Sensor;
using System.Collections.Generic;
using System.Threading.Tasks;
using UnityEngine;

public class KinectScript : MonoBehaviour
{
    // --- 省略  ---

    private void InitMesh()
    {
        // --- 省略  ---

        // ここにあったmesh.SetIndicesは、loopしているスクリプトに移動

        gameObject.GetComponent<MeshFilter>().mesh = mesh;
    }

    private async Task KinectLoop()
    {
        while (true)
        {
            using (Capture capture = await Task.Run(() => kinect.GetCapture()).ConfigureAwait(true))
            {
                // --- 省略  ---

                mesh.vertices = vertices;
                mesh.colors32 = colors;
                mesh.RecalculateBounds();

                // indicesを更新
               int[] indices = GetIndices(vertices);
                mesh.SetIndices(indices, MeshTopology.Triangles, 0);
            }
        }
    }

    // triangleのindiceを取得する関数
    private int[] GetIndices(Vector3[] vertices)
    {
        int width = kinect.GetCalibration().DepthCameraCalibration.ResolutionWidth;
        int height = kinect.GetCalibration().DepthCameraCalibration.ResolutionHeight;
        List<int> indicateList = new List<int>();

        for (int y = 0; y < height - 1; y++)
        {
            for (int x = 0; x < width - 1; x++)
            {
                int index = y * width + x;
                int a = index;
                int b = index + 1;
                int c = index + width;
                int d = index + width + 1;

                bool isVaridA = vertices[a].magnitude != 0;
                bool isVaridB = vertices[b].magnitude != 0;
                bool isVaridC = vertices[c].magnitude != 0;
                bool isVaridD = vertices[d].magnitude != 0;

                if (isVaridA & isVaridB & isVaridC)
                {
                    indicateList.Add(a);
                    indicateList.Add(b);
                    indicateList.Add(c);
                }

                if (isVaridC & isVaridB & isVaridD)
                {
                    indicateList.Add(c);
                    indicateList.Add(b);
                    indicateList.Add(d);
                }
            }
        }
        return indicateList.ToArray();
    }
}
これで最初に乗せた動画のようにMesh化することができました。
完全版Script
TopologyをInspector上で選択できる機能を追加し、自己流に改造してみたコードがこちら。 コピペで動くはずです。

using Microsoft.Azure.Kinect.Sensor;
using System.Collections.Generic;
using System.Threading.Tasks;
using UnityEngine;

[RequireComponent(typeof(MeshFilter))]
public class KinectScript : MonoBehaviour
{
    [SerializeField] private MeshTopology _meshTopology = MeshTopology.Triangles;

    private Device _kinectDevice;
    private Transformation _kinectTransformation;

    private int _pointNum;
    private int _pointWidth;
    private int _pointHeight;

    private Mesh _mesh;
    private Vector3[] _meshVertices;
    private Color32[] _meshColors;

    private void Start()
    {
        InitKinect();
        InitMesh();
        Task task = KinectLoop();
    }

    private void OnDestroy()
    {
        _kinectDevice.StopCameras();
    }

    //Kinectの初期化
    private void InitKinect()
    {
        // kinect device
        _kinectDevice = Device.Open(0);
        _kinectDevice.StartCameras(new DeviceConfiguration
        {
            ColorFormat = ImageFormat.ColorBGRA32,
            ColorResolution = ColorResolution.R720p,
            DepthMode = DepthMode.NFOV_2x2Binned,
            SynchronizedImagesOnly = true,
            CameraFPS = FPS.FPS30
        });
        _kinectTransformation = _kinectDevice.GetCalibration().CreateTransformation();

        // point count
        _pointWidth = _kinectDevice.GetCalibration().DepthCameraCalibration.ResolutionWidth;
        _pointHeight = _kinectDevice.GetCalibration().DepthCameraCalibration.ResolutionHeight;
        _pointNum = _pointWidth * _pointHeight;
    }

    //Mesh情報の初期化
    private void InitMesh()
    {
        _mesh = new Mesh();
        _mesh.indexFormat = UnityEngine.Rendering.IndexFormat.UInt32;
        _meshVertices = new Vector3[_pointNum];
        _meshColors = new Color32[_pointNum];

        _mesh.vertices = _meshVertices;
        _mesh.colors32 = _meshColors;

        gameObject.GetComponent<MeshFilter>().mesh = _mesh;
    }

    //Kinectからデータを取得→描画
    private async Task KinectLoop()
    {
        while (true)
        {
            using (Capture capture = await Task.Run(() => _kinectDevice.GetCapture()).ConfigureAwait(true))
            {
                Image colorImage = _kinectTransformation.ColorImageToDepthCamera(capture);
                BGRA[] colorArray = colorImage.GetPixels<BGRA>().ToArray();

                Image xyzImage = _kinectTransformation.DepthImageToPointCloud(capture.Depth);
                Short3[] xyzArray = xyzImage.GetPixels<Short3>().ToArray();

                for (int i = 0; i < _pointNum; i++)
                {
                    _meshVertices[i].x = xyzArray[i].X * 0.001f;
                    _meshVertices[i].y = -xyzArray[i].Y * 0.001f;
                    _meshVertices[i].z = xyzArray[i].Z * 0.001f;

                    _meshColors[i].b = colorArray[i].B;
                    _meshColors[i].g = colorArray[i].G;
                    _meshColors[i].r = colorArray[i].R;
                    _meshColors[i].a = 255;
                }

                // update vertices and colors
                _mesh.vertices = _meshVertices;
                _mesh.colors32 = _meshColors;

                // update indices
                List<int> indiceList = GetIndiceList(_meshVertices);
                _mesh.SetIndices(indiceList, _meshTopology, 0);

                _mesh.RecalculateBounds();
            }
        }
    }

    // meshのindicesを取得
    private List<int> GetIndiceList(Vector3[] vertices)
    {
        List<int> indiceList = new List<int>();

        if (_meshTopology == MeshTopology.Points)
        {
            for (int i = 0; i < _pointNum; i++)
            {
                bool isVaridPoint = vertices[i].magnitude != 0;
                if (isVaridPoint)
                {
                    indiceList.Add(i);
                }
            }
            return indiceList;
        }

        for (int y = 0; y < _pointHeight - 1; y++)
        {
            for (int x = 0; x < _pointWidth - 1; x++)
            {
                int index = y * _pointWidth + x;
                int a = index;
                int b = index + 1;
                int c = index + _pointWidth;
                int d = index + _pointWidth + 1;

                bool isVaridA = vertices[a].magnitude != 0;
                bool isVaridB = vertices[b].magnitude != 0;
                bool isVaridC = vertices[c].magnitude != 0;
                bool isVaridD = vertices[d].magnitude != 0;

                switch (_meshTopology)
                {
                    case MeshTopology.Triangles:
                        if (isVaridA & isVaridB & isVaridC)
                        {
                            indiceList.Add(a);
                            indiceList.Add(b);
                            indiceList.Add(c);
                        }
                        if (isVaridC & isVaridB & isVaridD)
                        {
                            indiceList.Add(c);
                            indiceList.Add(b);
                            indiceList.Add(d);
                        }
                        break;

                    case MeshTopology.Quads:
                        if (isVaridA && isVaridB && isVaridC && isVaridD)
                        {
                            indiceList.Add(a);
                            indiceList.Add(b);
                            indiceList.Add(d);
                            indiceList.Add(c);
                        }
                        break;

                    default:
                        if (isVaridA & isVaridB)
                        {
                            indiceList.Add(a);
                            indiceList.Add(b);
                        }
                        if (isVaridC & isVaridD)
                        {
                            indiceList.Add(c);
                            indiceList.Add(d);
                        }
                        break;
                }
            }
        }
        return indiceList;
    }
}
補足情報
リポジトリ
Assets/_Project/Scenes/_Mocks/KinectMeshSample.unity: 本記事と同様バージョンAssets/_Project/Scenes/KinectMeshSimpleColorVertex.unity: Extenject(Zenject)、UniRxを使用したバージョン
AzureKlnectに関する個人用勉強場所です。参考までに。
他参考記事
必要な画面(ローディング・エラー)まとめ
※ この記事は撤退予定のQiitaからの移植です。 ※ 2019年12月05日に投稿
背景
8thWallを用いてWebAR制作すると、メインコンテンツ以外に用意しなくてはいけない画面(ローディング、エラー、PC画面)がたくさんあります。 中には「iOSの特定のバージョンだけ出すエラー」といった限定的なものもあり、かなりややこしく感じました。
開発途中に「やっぱりこの画面も必要でした!」とならないように、まとめておきます。
公式サンプルのローディング・エラー画面
以下サンプルをみると、8thWallが用意してくれている画面が表示されます。 https://github.com/8thwall/web/tree/master/examples
これらはXRExtrasの loadingmodule と runtimeerrormodule が表示してくれているものです。(開発の話は別記事で投稿予定)
本記事ではサンプルのスクリーンショットを交えつつ、オリジナルで画面を作る場合の注意点を書いていきます。
iOS、Android 共通
ローディング
サンプルでは8thWallロゴが回転する画面が出ます。 ローディングが完了すると、フェードアウトしてカメラ映像が表示されます。
オリジナルで制作する場合 全画面を覆うデザインであれば基本的に自由です。
ただし、商用公開時には「Powerd By 8thWall」のマークを入れる必要があるでしょう。 私が8thWall社に商用公開の連絡をした際にお願いされたことや、スパイダーバースARなど過去事例でも入っていることから確定事項かなと思います。
共通エラー
- 起動後(
onStart後)にエラーが起きた時 - リアカメラのみ使用可能なSLAM(空間認識)をフロントカメラで使おうとした場合
に表示する画面です。主にお世話になるのは前者です。

オリジナルで制作する場合 「エラーが起きました」という内容とともに、リロードを促すようにしましょう。
userPromptErrpr
XR8(8thWallのAPI)プロンプトがユーザー側から拒否されている時に出るエラーのようです。 いろんな端末を使用しましたが、出たことのないんですよね...(自分だけでしょうか?)

オリジナルで制作する場合
リロードを促しましょう。正直、共通エラー画面と一緒のデザインにしてしまってもいいかなと思います。
Android限定
カメラ許可エラー
Chromeの設定で「サイトの設定 -> カメラ」という項目があります。 デフォルトでは「最初に確認する」になっていますが、ユーザーが意図的にOFFにしている(もしくはアドレスをBlockしている)とこのエラーが出ます。
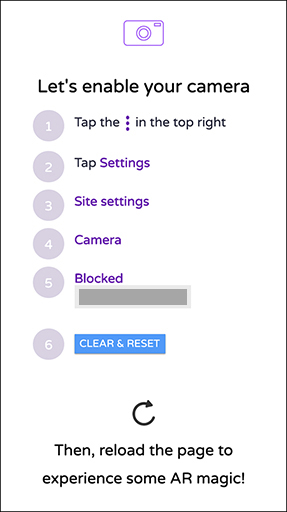
オリジナルで制作する場合
- 右上メニューから設定を開く
- サイト設定を開く
- カメラを開く
- アクセス拒否を解除
という誘導をしましょう
iOS限定
カメラ許可エラー
先ほど書いたAndroidカメラエラーのiOSバージョンです。 「設定アプリ -> Safari」で「カメラとマイクのアクセス」がOFFになっていると、この画面が出ます(デフォルト設定ではON)。

オリジナルで制作する場合
Safari設定の変更を促す&リロードしてもらう内容にしましょう。
モーションセンサーエラー
これが一番厄介なエラー。iOS11以下、iOS12、iOS13でパターンが変わります。
iOS11以下

iOS11以下では、モーションセンサー機能はデフォルトでONです。 バージョンによっては、設定アプリにモーションセンサーON/OFFの項目がありませんでした。
オリジナルで制作する場合
「設定アプリ -> Safari」を見直してもらって、リロードしてもらいましょう。
iOS12

iOS12では、デフォルトでモーションセンサーが拒否されている問題があります。 参考 : iOS 12.2でWebVRとWebARが半ば終わった件について
ほとんどのユーザーが直面するエラーのためか、8thWallサンプルも詳細に設定手順が書かれています。
オリジナルで制作する場合
サンプル同様、細かく設定を促すことをお勧めします。
- 設定アプリを開く
- Safariを開く
- 「モーションと画面の向きのアクセス」をON
- リロードする
iOS13
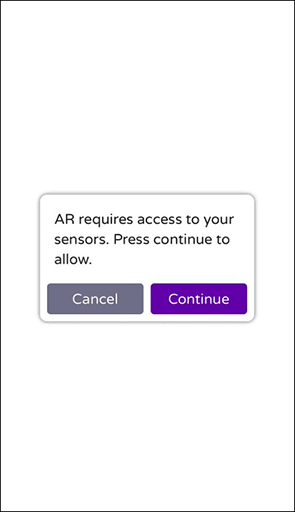
iOS13では改善されて、モーションセンサーへのアクセスが初期状態で許可されています!
...と思いきや、「一度ユーザーの承諾を得る必要がある」という仕様が加わりました。ボタンを押す必要があり、結局用意する画面が1つ増えてしまいました。 サンプルでは、ローディング画面の上にモーダルが出て、「Continue」を押すとさらにモーションセンサー許可に進めます。
ちなみにこのモーダルだけ、XEExtrasではなくXR8で生成されている模様です。
参考 : iOS13でWebARとWebVRにおけるデバイスモーション設定が改善しました! iOS 12.2で半ば終わったWebVRとWebARがiOS 13でどうなったか
オリジナルで制作する場合
承諾ボタンを搭載したモーダルか画面を用意しましょう。
ボタンの挙動は上記記事を参考に、DeviceMotionEvent.requestPermission()とDeviceOrientationEvent.requestPermission()を使用しましょう。
PC

8thWallはPCでの使用ができません。 QRコードを載せつつ、スマートフォンでのアクセスを誘導する画面を用意しましょう